

Why Vehicle Inspection Should Happen Before Every Detailing Service
Introduction
Before starting any detailing service, it is important to take a few minutes to inspect the vehicle properly.
A car may look clean from a distance, but its paint surface can tell a different story. Swirl marks, scratches, water spots, oxidation, contamination, and previous repair work may not be clearly visible at first glance.
If a detailing professional starts working without checking these conditions, the service may not deliver the expected results. In some cases, it can even lead to unnecessary paint correction, customer complaints, or damage to sensitive surfaces.
That is why vehicle inspection before detailing should be a regular part of every professional detailing process.
It is not just about checking the car. It is about understanding the vehicle, choosing the right treatment, and making sure the customer knows what to expect.
A proper inspection helps detailers work with confidence and deliver more consistent results.
What Is a Pre-Detailing Vehicle Inspection?
A pre-detailing vehicle inspection is a process of checking the vehicle’s condition before any cleaning, polishing, paint correction, ceramic coating, or other detailing service begins.
The inspection helps identify the current condition of the vehicle and any areas that need special attention.
A professional inspection usually includes:
- Paint condition and visible defects
- Swirl marks and scratches
- Water spots and mineral deposits
- Paint oxidation and fading
- Existing ceramic coating or wax
- Plastic trims and rubber surfaces
- Glass condition
- Interior condition
- Previous paint repairs
- Sensitive or damaged areas
The purpose is simple: understand what the vehicle needs before deciding how to work on it.
Why Vehicle Inspection Is Important Before Every Detailing Service
1. It Helps Identify Existing Paint Defects
Every vehicle has a different paint condition.
Some cars may have light swirl marks caused by improper washing. Others may have deeper scratches, oxidation, water spots, or paint defects from previous detailing work.
Without inspection, it can be difficult to understand which defects can be safely improved.
For example, a customer may expect a completely scratch-free finish, but the vehicle may have deep scratches that cannot be removed safely through normal polishing.
Inspecting the paint before starting helps the detailer identify these issues and explain the realistic outcome.
2. It Helps Set the Right Customer Expectations
One of the biggest challenges in detailing is customer expectations.
A customer may believe that polishing will remove every scratch or make the vehicle look exactly like new.
However, not every paint defect can be corrected completely.
During inspection, the detailer can explain:
- Which defects can be improved
- Which scratches may remain visible
- Whether paint correction is required
- Whether the paint condition is suitable for polishing
- What level of finish can realistically be achieved
This conversation helps avoid misunderstandings after the service is completed.
3. It Helps Choose the Right Products and Process
Not every vehicle needs the same detailing treatment.
A vehicle with light swirl marks may require a different polishing approach from a car with heavy oxidation or sensitive paint.
Inspection helps detailers decide:
- Which polish to use
- Which pad is suitable
- Whether a test spot is necessary
- How aggressive the correction should be
- Whether the surface requires decontamination
- Which protection product is appropriate
Instead of using the same process on every vehicle, the detailer can choose a treatment based on the actual condition of the paint.
4. It Prevents Unnecessary Paint Correction
Paint correction should be performed only when it is needed.
If a vehicle has minor defects, aggressive polishing may remove more clear coat than necessary.
A proper inspection helps the detailer understand the severity of the defects and choose a safer approach.
The goal should not be to remove every visible mark at any cost.
The goal is to improve the appearance of the paint while preserving as much of its protective layer as possible.
5. It Helps Identify Sensitive and Damaged Areas
Some vehicles have areas that require extra care.
These may include:
- Repainted panels
- Thin or damaged clear coat
- Peeling paint
- Cracked plastic trims
- Loose badges
- Damaged rubber seals
- Existing coating failures
These areas should be identified before polishing, washing, or applying any detailing product.
This helps reduce the risk of accidental damage during the service.
6. It Makes the Service More Professional
Customers appreciate when a detailer takes the time to understand their vehicle before starting work.
A proper inspection shows that the business is not following a one-size-fits-all approach.
It also gives the customer confidence that their vehicle is being handled carefully.
For a detailing studio, this small step can make a big difference in the overall customer experience.
7. It Helps Document the Vehicle’s Condition
A vehicle inspection should include photos of existing scratches, dents, paint defects, damaged trims, and other visible issues.
These photos can be stored with the customer’s service record.
This is especially useful when:
- The vehicle has existing damage.
- The customer has requested paint correction.
- Ceramic coating or PPF is being installed.
- Multiple technicians are working on the vehicle.
- The customer is returning for another service.
Documentation helps both the customer and the detailing team maintain a clear record of the vehicle’s condition before work begins.
What Should a Detailer Check During Vehicle Inspection?
A detailed inspection should cover the vehicle’s major exterior and interior areas.
| Inspection Area | What to Check | Why It Matters |
| Bonnet / Hood | Swirl marks, scratches, water spots | Helps determine polishing requirements |
| Doors | Paint defects, dents, previous repairs | Identifies panel-specific issues |
| Roof | Oxidation, fading, contamination | Helps select suitable treatment |
| Bumpers | Scratches, paint damage, plastic condition | Prevents unsuitable correction |
| Glass | Water spots, scratches, contamination | Helps determine glass treatment |
| Plastic Trims | Fading, cracks, residue | Supports safe trim care |
| Wheels | Brake dust, stains, surface damage | Helps select cleaning products |
| Interior | Stains, tears, odors, damaged surfaces | Helps define interior detailing scope |
| Repainted Panels | Paint condition and thickness variation | Requires extra care during correction |
How to Perform a Proper Vehicle Inspection Before Detailing
A consistent inspection process helps the detailing team avoid missing important details.
Step 1: Walk Around the Vehicle
Start with a complete walk-around inspection.
Check the bonnet, roof, doors, bumpers, mirrors, and other visible surfaces.
Look for scratches, dents, stains, paint defects, and damaged trims.
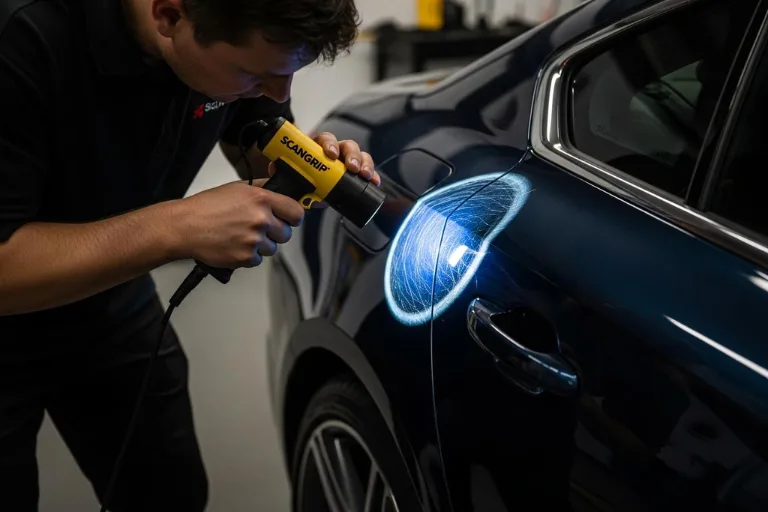
Step 2: Use Proper Inspection Lighting
Normal workshop lighting may not reveal every paint defect.
Use a suitable inspection light to identify swirl marks, fine scratches, haze, and polishing marks. Check the panels from different angles.
This is particularly important before paint correction and ceramic coating.
Ask a Pro Blog+1
Step 3: Inspect the Paint Thickness When Needed
For machine polishing or paint correction, a paint thickness gauge can help assess the overall paint thickness and identify variations between panels.
This is especially useful when the vehicle has repainted panels or an uncertain repair history.
A thickness reading generally measures the complete coating stack, not just the clear coat. Therefore, readings should be interpreted carefully by a trained professional.
Step 4: Identify Surface Contamination
Some contaminants may remain even after a regular wash.
Depending on the vehicle’s condition, the detailer may need to check for:
- Embedded dirt
- Tar
- Iron particles
- Mineral deposits
- Tree sap
- Paint overspray
The appropriate decontamination process should be selected based on the surface and the contamination present.
Step 5: Perform a Test Spot Before Paint Correction
If paint correction is required, perform a small test spot first.
This helps determine which pad and polish combination provides the desired result with the least aggressive approach.
The detailer can then adjust the process before working on the entire vehicle.
drbeasleys.com+1
Step 6: Take Before-Service Photos
Take clear photos of the vehicle before beginning the detailing service.
Capture existing scratches, dents, paint defects, and any areas requiring special attention.
These photos can be shared with the customer and saved in the job record.
Step 7: Confirm the Service Plan With the Customer
After inspection, explain the vehicle’s condition and the recommended service.
Make sure the customer understands the expected results, limitations, and any additional work that may be required.
This step helps avoid confusion when the vehicle is ready for delivery.
Common Vehicle Inspection Mistakes Detailers Should Avoid
Even experienced detailers can miss important issues when they rush through the inspection.
| Common Mistake | Possible Problem | Better Practice |
| Inspecting only under normal lights | Fine scratches may be missed | Use dedicated inspection lighting |
| Starting polishing without checking paint | Unnecessary correction or damage | Inspect paint before selecting the process |
| Ignoring repainted panels | Different paint behavior during polishing | Check panel condition and thickness |
| Not taking before photos | Difficult to document existing damage | Maintain photo records |
| Promising complete scratch removal | Unrealistic customer expectations | Explain achievable results |
| Using the same process on every car | Inconsistent detailing results | Customize the process based on inspection |
| Skipping customer confirmation | Service misunderstandings | Confirm the scope before starting |
Vehicle Inspection Checklist for Detailing Professionals
This simple checklist can be used before every detailing service.
Pre-Detailing Inspection Checklist
Complete vehicle walk-around inspection
Check existing scratches, dents, and paint defects
Inspect paint under suitable lighting
Check for previous paint repairs
Measure paint thickness where appropriate
Identify surface contamination
Inspect glass, trims, wheels, and interior
Take before-service photos
Record existing damage
Discuss service expectations with the customer
Confirm the detailing process
Obtain customer approval before starting
0 of 12 checks completed
Frequently Asked Questions (FAQs)
1. Why is vehicle inspection important before detailing?
Vehicle inspection helps identify existing paint defects, scratches, contamination, and damaged surfaces before work begins. It also helps detailers choose the correct products and process.
2. Should every car be inspected before detailing?
Yes. Every vehicle should receive a basic inspection before detailing. The level of inspection may vary depending on the service, vehicle condition, and customer requirements.
3. What should be checked before paint correction?
Detailers should check swirl marks, scratches, oxidation, paint condition, previous repairs, and paint thickness where appropriate. A test spot should be performed before full correction.
4. Can vehicle inspection prevent customer complaints?
Yes. Documenting the vehicle’s condition and explaining realistic results before starting helps reduce misunderstandings and customer complaints.
5. Is a paint thickness gauge necessary for every detailing service?
Not necessarily. It is particularly useful when performing machine polishing or paint correction, especially on vehicles with uncertain repair histories or repainted panels.
6. Why are before-service photos important?
Before-service photos help document existing scratches, dents, and other defects. They provide a clear record for the detailing team and customer.
7. Does vehicle inspection help save detailing time?
Yes. Inspection helps identify the correct process before work begins, reducing unnecessary polishing, product usage, and repeated work.
8. Should inspection be performed before ceramic coating?
Yes. The paint should be inspected before ceramic coating because existing defects may remain visible beneath the coating. Inspection helps determine whether paint correction or preparation is required.
Conclusion
Vehicle inspection is one of the most important steps in a professional detailing service, even though customers may not always notice it.
Taking a few extra minutes to inspect the vehicle can help identify existing damage, select the right products, avoid unnecessary paint correction, and set clear customer expectations.
Every car has a different surface condition. A process that works well on one vehicle may not be suitable for another.